
Pallet Wall


When we designed our home I knew I wanted big, open and vaulted ceilings. I love the open concept idea... so that's what we did. When this wall was being framed I remember looking at it and thinking how am I ever going to decorate it and make it look cute and of course it wasn't an option to leave it bare. When we were building, the pallet walls were "the thing." I remember thinking how perfect it would look up there... plus I had to keep my word to my husband about the saw blades being in our home one day, umm what better spot to put them??
                                                   This is what it looked like when I was having all these thoughts.....
This is what it would look like if I left it bare.... Umm no, it's like naked!
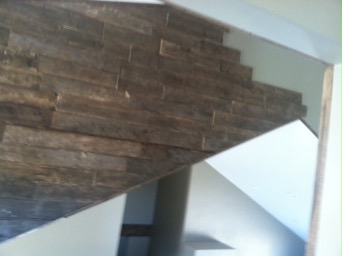
Starting the pallet wall
My vision was coming to life. I was so stinking excited. I seriously never slept the whole time we built our house because I was too stinking excited to be doing everything I had ever dreamed about.. My husband would measure and cut, and I sanded (we actually used a grinder because it was faster and I loved how it gave it some dimension and character) each piece. Then I would hand it back to him and he nailed them to the wall.

This part was a little bit scary. It's a good thing they love me.


Of course I had to hang one saw blade up to make sure it looked good before we finished, and well lets be honest I am not a patient person. (I am trying to work on that but it's taking forever to get there.. lol)


and finished!

I feel like this wall helped out house go from 'just a house' to 'our home' and tells part of a story about who we are.

Comments

Popular posts from this blog

DIY can dispenser

I wanted to add a can dispenser to my large awkward pantry to try and utilize all the space. First we got a sheet of plywood from our local White Mt Lumber then we cut it down to 3 1/2' x 7'. If it sounds huge that's because our pantry's huge. The first thing I did was stain the plywood because even though it is for our pantry I wanted it to look good and not like all the ones I've seen on Pinterest. Not pictured: After I put a coat of stain on I used a brush and some white painted and just dabbed a little paint on the end of the brush and did long quick brush strokes to get an antiqued white finish. Then we (my carpenter and I aka my husband) started cutting the slots for the cans. We decided to make two separate sections for cans, one on the top and one on the bottom. We measured the cans that I had the most of and got the dimensions for the can slots off of them. Why do cans have to come in a million different and sizes?? We cut as many boards
DIY Blanket Ladder   I've been loving the blanket ladders so I decided to build my own. First I ripped down some boards we had in the garage to 1 1/2"x 1 1/2" by x 5' long. Then I cut 4-18" ladder rungs. I decided to fasten it all together with 2" screws. I predrilled all my screw holes so the wood wouldn't split. I don't mind the screws being visible but if you do you can always counter sink the screw holes and plug the hole with a dowel and sand it smooth.  The first rung is on a 13" center from the top of the ladder. The other 3 are on 10" centers. Then I just used some left over stain I had (dark walnut) and stained each of them. Tada just like that you have your own blanket ladders.

Baby Farmhouse Table

I'm not sure if it's a good thing that I live an hour away from Lowes, Target and Hobby Lobby because when I get a chance to go to these stores I stock up and spend way too much money. I was wondering Lowes and found some coffee table legs and snatched them up, I really didn't know what I was going to do  with them so they sat in my garage for a few weeks. (The legs cost about $10 each.) In the mean time I decided I wanted to build a baby farmhouse table for my girls playroom. The first thing I did was build the inside frame like so... Disclaimer: I am by no means a pro at building and have never been taught, I've just watched and helped my husband build things and self taught. I'm still learning as I go. One thing I'm finding I need to add is a 2"x2" support in the middle of the frame to make it a little more sturdy. I planed some lumber down that we had in the garage and ripped down a 2"x 2" for the frame and a attached the